Tuesday, July 31, 2012

No.3 - Gingerbread Man or a Gingerbread House

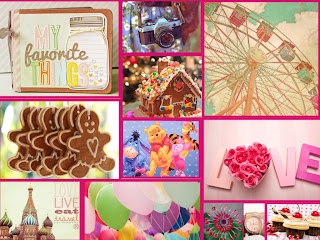
A Gingerbread Man or Gingerbread House comes in as my third possibility as a clock design. The reason it is not first or second is because I think they are quite simple in shape e.g. a house or man. But with the different shapes and textures on these clock ideas I could make them extremely interesting. For example:

Gingerbread Man:

  • I could make it look as though I have piped the eyes, nose, mouth etc. onto it. This would add more textures and make it actually look like a Gingerbread Man.


Gingerbread House:
  • I could also use different materials to make the different lollies on the house.
  • I could make the house seem more like a house by making windows, letter-boxes, flower-boxes, a door etc.

My only problem with these designs would be that they could be too simple, I wouldn't really have a place to put the numbers onto (which isn't necessarily that bad!), I would also have trouble making the house actually look 3D e.g. the roof and all four walls, without drawing it on its side which may look quite weird. My other option would then be to just do the front of the house, but again that would be to simple and not that interesting to the eye.

If I did end up choosing to do these clock ideas, I am sure I could work cooperatively with Mr Andrews so he could help me come up with a solution to solving the aspects of these clock ideas I do not like!

No.2 Jar

This is just an idea of a jar - not the exact one I am doing.
However if I will do it and I like the shape, I could print,
 cut it out and then trace the shape.
My second possibility for a clock design (my backup) would be a jar. I think this would be a fantastic idea as I could make little trinkets or objets out of other materials and then put them on top of the jar cut-out, making it seem as if I have things in the jar. This design would have a lot of room for colour; the different objects in the jar, a lot of room for texture; also the different objects in the jar but the lid of the jar and the string to tie around the lid. I would also be able to show many different skills by making the many different objects. If I felt it were necessary or I really wanted to, I could make different objects with the numbers 1-12 on them to symbolise the time. This would be a great idea as it would come across as more of a clock, rather than a jar with ticking hands on it. If space didn't allow or I felt it weren't necessary and didn't look good, I could always just make objects with only a few numbers on them e.g. 12, 3, 6, 9.

Overall I feel this would be a fantastic idea as I could incorporate many different skills, colours, textures  and ideas into this clock. I also think it is a really sweet idea and actually resembles a clock!

No. 1 - Ferris Wheel

A ferris wheel would be my first preference as a clock design for many reasons. Some of these include:

  • I think it would be a fantastic design to use different skills, techniques and materials I could use and do.
  • It would be different as there would be many slits cut out (because in a ferris wheel the arms are not all joined together and they don't have a backing board, the carrousels also swing freely), this would also make it interesting as my clock would not be a block shape.
  • I would be able to make 12 carrousels each with the numbers 1-12 to symbolise the numbers of time on the clock and also the numbers of each carrousel.
  • I would be able to incorporate many variations of colour and 3D elements e.g. each carrousel or arm could be a different colour, I could make little lights to put on the arms (beads, scrunched up paper and cardboard which is then glued in the shape of a small ball) or I could even make little roofs for the carrousels which could involve different colours and textures. 
  • As the hands are ticking away it would give the effect that the ferris wheel was moving as they are both moving in the same circular motions (only the ferris real in reality, not on the actual clock).
  • I would also like to do this design as I simply like ferris wheels, I think it will show different techniques I can use and I really think this will make a fantastic clock...it would also go nicely in my room or study (not that that is influencing my choice)!

If by any chance I am not able to make slits in the ferris wheel, I would be okay showing that using 3D elements and paining the background blue for the sky!

Overall, I would really love to make/do this clock design an I think it is a very smart and unique idea!

All My Possible Clock Designs

These were my original clock designs, but I shortened this down to 3 designs.
(in order of preference):

1. A Ferris Wheel
2. A Jar - this would be a clear jar so you could see little belongings inside it
3. Either A Gingerbread House or a Gingerbread Man - like the actual foods.

Please continue reading to see my evaluations on each of these possibilities!

Saturday, July 28, 2012

Our First Lesson - Reflection

Today was our first day of Design Futures and the main point of the lesson was to know everything! From what our goals for this semester were to safety in the workshop. The different tools we would be using or would see Mr Andrews use, to the make and design of our clocks. From safety in the workshop to doing our blogs and the computer room. This was our starter lesson!

Firstly, we were escorted by Mr Andrews to a computer room (above the workshop), this is where he said we would be having our initial lessons so we could learn about DF, the workshop, safety, the design and make of our clocks and our blogs. We then sat down and watched  PowerPoint describing what we needed to know. We learnt about the practicality of old and new designs which would help us when the time came to start thinking about our clock designs, we also learnt that our grades would also be related to how detailed and what we posted on our blogs. Another key factor to the powerpoint was safety and rules for the workshop.

About half-way through the powerpoint, Mr Andrews took us down to the workshop so we could understand the rest of the PowerPoint. This was my favorite part of the lesson! Firstly we put on our aprons and goggles and were told about the yellow lines on the floor - unless told we were not aloud to go past them, we were also informed of two important buttons - the first was a button that turned all power on in the workshop, and the second immediately cut all power off incase of an emergency. After we were all clear on when and why we would need to use the buttons Mr Andrews took us over to some clocks other students were either in the process of or had finished making. This is where we also learnt how we would make our clocks.

Firstly, we would draw our main shape onto a piece of MDF wood and once we were happy with it, Mr Andrews would cut it out with a machine - something too dangerous for us to use! After the main shape was cut out, Mr Andrews would then use a sanding-like machine (again, far to dangerous for us to use) to smooth out the edges, or make finer indentations. The next step heavily involved us! We would use other materials like extremely thick cardboard, corrugated cardboard, pipe-cleaners or other materials found to make the small details of our clock such as wings, different textures or many other design elements. Mr Andrews then showed us the many different tools we would use to make this possible - some more complex and dangerous than others. The next step was then Mr Andrews' task, he would put our wood mould into a machine, warm up some plastic and compress it over the moulds - picking up every single little detail. After a few minutes he would separate the two, and voila! We would have our plastic clock. The final task was again for us to do! We would cut out the plastic clock and paint it from the inside - any colour we wanted. This was so we would still have the shiny plastic effect! After our base was dry we would attach the hands to the front and battery/machine of the clock to the back ready to take home! Whilst explaining this to us Mr Andrews was demonstrating with a sample clock, so we could experience it first-hand before trying it out our selves. 

After we understood and knew our goals for this Semester, Mr Andrews took us back to the computer room to finish off the PowerPoint.

Based on our lesson today, I am very much looking forward to this Semester and cannot wait until we start making our clocks!