Saturday, November 3, 2012

MY VACUUM FORMED CLOCK

YAYAYAYAYAYAYAYAYAYAYAYAYAY! Last lesson my clock was finally vacuum-formed! And can I just say, it looks pretty good. The layers have worked extremely well to create interest and 3D realism. A viewer can easily tell my clock design is of a Ferris Wheel, and the inner piece that I have changed to a star adds repetition and unity. I think that the numbers of the clock are very obvious and will stand out even more once the clock mechanism is put into place.

Just before I asked Mr Andrews to Vacuum-Form my clock, I had just finished hot glue gunning my layers down and had left them to set for about 10 minutes, just enough time to be the last person to get my clock Vacuum-Formed before the bell rang. My clock was placed in the Vacuum-Former with Eliza's VW which looked amazing. When the process was underway we heard a pop or bang which meant one of our moulds were either to pointy or sharp or the plastic had to stretch too far before it gave in. Luckily it was Eliza's and she did not have to re-Vacuum-Form her clock!

Once mine had cooled down Mr Andrews showed me that some of my small circles (on the carrousels) had attached to the plastic along with both numbers (1&2). I was okay with this though as they were the smallest pieces and I had only just stuck them down - so I wasn't taken by too much of a surprise.

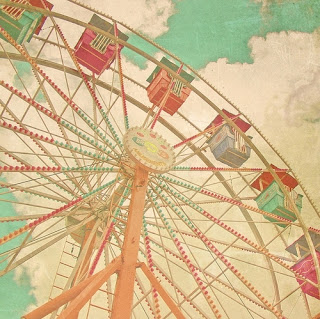
Now all I have to do is paint my clock in many thin layers ready for Wednesday's lesson when Mr Andrews can put the clock mechanism in. After that our clocks will be completed and the class will do some reflections and sheets based on this Semester and this blog. For my paint I am thinking to have the inner piece bright red then fading out to a soft pink by the time we get to the base of the Ferris Wheel. The background (behind the Ferris Wheel shape) will be painted a light blue for the sky - maybe with clouds if the clock isn't too busy already. I am also thinking painting the background a darker colour like black to all attention is drawn to the Ferris Wheel only on a nice frame. Each carousel is going to follow a rainbow pattern starting at 1 and finishing at 11, these will be the most exciting part of the design. The posts connecting the carousels to the body of the Ferris Wheel will be painted red to tie back into the centre piece of the clock. The little dots in the middle of the carousels will either be painted red or the same colour as the carousels themselves - I will see what looks best.

My Vacuum-Formed clock. Still with the numbers stuck.  
The last stages of our clock making are coming so rapidly but I really cannot wait until next lesson when our clocks will basically be completed. Stay posted until next lesson. Bye!

Thursday, October 25, 2012

Our 3rd Lesson For Term 4

My Layers
Our last lesson for me was something I very much enjoyed as I accomplished all my goals so that I will be ready for vacuum-forming next week. Really, all I have to do is cut out 5 more carriages by tracing the already completed 1-6 - this way the Ferris Wheel will look symmetrical. I have also decided to recut the centre piece as it is a side on view compared to the front view of the rest of the Ferris Wheel, this will make it more appealing and understandable to the eye. Last lesson I also decided to trace the sticker numbers 1 and 2 to make the number 12 onto cardboard. I then suck the two together to resolve my problem of not actually layering and just having everything even and on the same level. I have taken my clock and all materials that I have done so far home, so that I can finish cutting out my carriages and complete the same activity I did with the the number to the legs of the Ferris Wheel. I will also have a chance to redraw and cut out the centre piece, and sand back the edges of all my cardboard shapes - these are meant to look like sharp edges but this can be accomplished and done properly without the edges actually being sharp which will then effect the plastic when the mould/die being Vacuum-Formed. In our next DF lesson on Monday I will check with Mr Andrews that everything is good and no problems look evident before he Vacuum-Forms it. I will then take it home again to paint the plastic clock in many thin layers of paint. I am thinking that every carriage will be a different colour starting from yellow, orange and then red, through to pink then purple, blue and finishing with green.


My Clock
So far I am extremely happy with the progress I have made and look forward to when my clock is Vacuum-Formed.

Saturday, October 20, 2012

Second Lesson - Term 4

Our second week back into the Term, and some people have already finished their clocks or are extremely close to that point. Initially this made me feel quite worried as I thought I was behind, but I realised many other people are at the same point as me or even behind - so I am thinking after I have completed my clock, I may be helping others. The lesson for me however was quite productive mentally and on my clock.

Last lesson I had managed to get through the first layer and made a plan to accomplish - well, plan ACCOMPLISHED! I was able to get my second and third layer completed this lesson and am now onto my fourth which is half-way off completion. I have also made sure to make all edges neat as I was cutting. My plan after the fourth is to go right through to the end with all layers then come back to the carrousel layer. I have two reasons for this:

1. So I can see how much room I have and how large or small they need to be, along with the 'pole' holding them onto the body of the Ferris Wheel.
AND...
2. They are the most time consuming and I would like to have everything else completed first - worst comes to worst (which I am 99.9% sure it won't) I will just have no carrousels which wont look as bad compared to not having as many layers on the body or no legs to 'hold the Ferris Wheel up off the ground'.

Half way through the lesson Mr Andrews showed us the process of Vacuum-Forming again as Lily had completed her clock. All was good until one of the middle pieces from her Frangipani became stuck into the plastic as she did not use the Hot Glue Gun - which is crucial. Lily then went away with her plastic ready to take home to paint, however she will have to come up with a way to make sure her mould or die doesn't break as that will not be complying against the criteria of DF for Grade 7's in 2012.

Afterwards, we went back to our bench and I just wanted to check up with Mr Andrews with my design. He thinks I am going pretty well however some of my layers drop down and are therefore not really creating a layer as there is a gap (this happens with the stilts or legs at the bottom of my Ferris Wheel). Mr Andrews said not to be too worried, but if I could fix it, I probably should. This would probably be my first major 'bump in the road', but a new task to do to improve my clock's look and overall grade.

Next lesson, my goal is to finish off all layers and then the following lesson go back to the 12 individual carrousels. This should therefore only take another two lessons or three maximum.

Thank you very much, and keep posted for next weeks blog!

Saturday, October 13, 2012

First Lesson of Term Four


On Wednesday the 10th of October, 7K had our first DF lesson of the Term. This lesson, was quite important for me and my design process as I planned when I would like to accomplish certain parts of my clock, and some of my design elements changed.

When we arrived, I set straight into work - finishing off my first layer. Last Term I thought I had already done this, however leaving it and then coming back to look at this first layer I wasn't quite happy. So I simply sharpened a few edges (the cutting was a little dodgy on some Ferris Wheel spokes) and made sure to emphasise the fact that some spokes were of different sizes to others depending on the angle my Ferris Wheel has been set at. I was a little disappointed in myself for not cutting it out properly to start with, but after about five minutes of trying to cut that (extremely thick and hard) cardboard, I realised my hands must have been getting sore and tired.

Nevertheless, I made sure not to waste any time on starting and completing my second layer. During this time, I was also helping others carve their original piece of wood to the correct size. I was also helping others with cutting, glueing, tracing and giving the right advice. On a side comment this is where I would like to mention what I really enjoy about DF, we have a strict plan to follow, but we are still free to use what ever resources we would like and are able to help others whenever we feel necessary whilst doing our own work. Anyway, back to my clock...

Whilst doing my second layer I realised that I had sanded my original piece of MDF wood bad too far so my other layers would not fit once I added on the ferris Wheel Layers. You see, I was meant to have gaps for the spokes, but Mr Andrews told me that would take too long for the allocated time space. So I then went onto the idea of having my carrousels still on the main piece of wood but connecting them to the very top of the spokes. This would have worked if I hadn't sanded my base shape off too far, so now my idea is to have the carrousels on the side of the spokes and to paint the remanding spaces blue for the sky, this will also give the impression of the spokes.

Although my clock hit a little 'design stumble', I am actually quite glad of it, as I now have a better design which I am still extremely happy with. The end of the lesson for me was the spent tracing and cutting out my second layer, along with helping others with their clocks, as some still hadn't started their first layer, or were a little behind.

Next week, I am planning on doing my next few layers (I should get more done as they are smaller) before the carrousels. My plan is to do the carrousels last or all in one lesson along with the numbers, as their are twelve carrousels which are quite small and will be time consuming.

At this point, I feel extremely happy with how my clock is coming along so far, and absolutely cannot wait until the final version is completed!

Sunday, September 30, 2012

The Vacuum Forming Process


This is my final blog on these extra topics I am talking about that will help with the overall understanding of our clock making. Definitely in this case I have left the best until last, and will talk about Vacuum Forming - something that everyone in Grade 7 who has made a clock has seen and had the process used on their clock. 

Anyway, on with the description!

⟗⟗⟗⟗⟗

Vacuum forming is a manufacturing technique where thin plastic, and in this case, thermo plastic is shaped by heat and force. 

1. The first stage of vacuum forming is to make an accurate die or mould. This die must be very precise as any flaws will show when shaping the thermo plastic, any sharp edges can pop the plastic or if an edge is hanging over the plastic will wrap around that then underneath it causing the die to become stuck. 

2. The die is placed in the centre of the vacuum former

3. A sheet of thermo plastic is placed above the die and clamped into position.

4. The heater is turned on. When the machine is being used from ‘cold’ it takes about five to ten minutes to warm up to the temperature needed to heat the thermo plastic sufficiently.
Once warm, thermo plastic takes only four to five minutes to heat up before the vacuum forming process can begin.

5. The thermo plastic must become flexible before it can be formed properly.

6. Once the thermo plastic is ready the "Platen" or the base the die is placed on is lifted towards the thermo plastic sheet. The air underneath the thermo plastic and the die is pumped out and the thermo plastic takes the shape of the die.

7. You then pop your die out and cut out the plastic to just around your shape. 

8. The next part is the fun part, you can paint your plastic shape or decorate it in any way you want! TIP: A good tip for painting is to paint from the inside so you can see the coloured plastic still with the shine from the plastic.

                                                                 ⟗

Well, thats all from me on these Extra pieces of information and blogs! My blogs will now go back to my regular lesson reflections, unless there are any other topics to talk about or cover. Once again... Thank you very much! 

Saturday, September 29, 2012

Sustainability

This is my first post (out of two) on Processes and Things We Need To Think About in the workshop during our clock making process. This first blog is based on Sustainability. Please enjoy!

                                                                            ⧈⧈⧈⧈⧈

AN OVERVIEW ON PLASTIC AND SUSTAINABILITY: 


In order for a product or material to be truly described as sustainable it must be environmentally, economically and socially sustainable. These aspects have become known as the Three Pillars of Sustainability. Plastics make a positive contribution to all three pillars of sustainability.
Plastics make an immense contribution to the environmental sustainability through their energy saving potential and intrinsic recyclability and energy recovery options. Economically plastics form an important part of the UK economy and are a major export product. Socially the plastics industry is a major and inclusive employer with an attention to training and education.
ENVIRONMENTAL SUSTAINABILITY:
Plastics have a very good environmental profile.  Only 4% of the world’s oil production is used for plastics and much less energy is used to produce it compared to other materials.  Plastics are durable yet lightweight and thus save weight in cars, aircraft, packaging and pipework.
When plastics have completed their use phase, whether as a car bumper or a bottle, they can either be recycled or if this is not economic or environmentally beneficial the calorific value of the plastic can be recovered through energy from waste incineration to provide a much source of home-grown power. As a consequence plastics can be viewed as ‘borrowing’ the oil.


  • Plastics provide unparalleled benefits as a packaging material. This is because plastics are lightweight, resource efficient and offer excellent barrier properties. Due to these properties packaging items in plastics significantly reduce waste and saves energy.
  • Plastics have a huge role to play in sustainable construction, whether it be PVC windows, plastic foam insulation or plastic water pipes. 
  • Plastics have a number of inherent properties which make them an ideal material for modern
  • transport systems. Plastics are lightweight, corrosion free and easily moulded into complex  shapes without the need for assembly or fastening systems.
  • Plastics recycling takes place on a significant scale in the UK and there is considerable research conducted to discover the most efficient ways to recycle. Raw materials have a high value and are a precious resource, so to conserve both money and the environment the industry makes every effort to recover as much as possible.

ECONOMIC SUSTAINABILITY:

Plastics make a major contribution to the UK economy and a healthy manufacturing sector is vital to a sustainable economy.


Plastics contribution to the UK economy:


  • Circa 7400 plastics companies in UK.
  • The industry turnover is approximately £17 billion.
  • Plastics are a much need source of export revenue with circa £4.5 billion in exports.
  • For many plastics products, especially construction related products, the whole supply chain is situated within the UK.

Plastics also have a role to play at a micro-economic level:

    • Plastics products are very cost effective to produce and provide the ability to make single moulded components in complex shapes. This significantly reduces costs associated with assembly and the use of fixtures.
    Plastics also have a role to play at a micro-economic level:
      • Plastics products are very cost effective to produce and provide the ability to make single moulded components in complex shapes. This significantly reduces costs associated with assembly and the use of fixtures.
      There are also many other Economic benefits, but for now I will only stick to these (some of the most important).

      SOCIAL SUSTAINABILITY:

      Completing the final pillar of sustainability, plastics are also socially sustainable;
      • The UK plastics industry is socially inclusive and offers a wide range of worthwhile careers with considerable room for career development, progression and training. The industry is very attentive to training and this is led by Cogent (the Sector Skills Council) and Polymer Training in Telford.

      • Plastics companies are geographically widely distributed across the UK and provide jobs to some 180,000 people.

      • The plastics industry has a superb industry health and safety record as demonstrated by BPF accident survey statistics.

      • Plastics make a major contribution to safety, the used plastics in cars, for example, reduces weight and allows for the addition of safety features such as airbags. Furthermore, plastic foams such as EPS and EPP provide the necessary shock absorbency to be used in life saving devices such a bicycle helmets.

      Essential medical applications include:
      • Blood bags
      • Fluid bags
      • Heart and Lung bypass sets
      • Blood transfusion sets
      • Blood vessels in artificial kidneys
      • Surgical gloves
      • Catheters
      • Endotracheal tubing 
      Plastics are essential in modern day healthcare. Plastics products are used in surgery, healthcare products, pharmaceuticals, drug delivery systems and medical packaging.

                                                                                ⧈⧈⧈⧈⧈

      Thank you very much for taking the time to read about Plastic and its sustainability in the world. My final blog under these extra topics will be the Vacuum Forming Process. Stay posted!


      Cellulose Nitrate (Extra)

      This will be my final blog on materials we may use or encounter in the workshop...so enjoy!

      ⫷⫸⫷⫸⫷⫸

      The plastic cellulose nitrate was invented in the early 19th century, and is often thought of as the earliest synthetic polymer or plastic. The uses of cellulose nitrate range from everything including cutlery handles, toys and dolls, photographic film, and many other cosmetic, household and toiletry items. It was even used by Kodak, and other suppliers, from the late 1880s as a film base in photograph, X-ray films and motion picture films; and was known as nitrate film. After numerous fires caused by unstable nitrate films, safety film started to be used from the 1930s in the case of X-ray stock and from 1948 for motion picture film.The colour of an untouched, unprocessed cellulose nitrate plastic is transparent and colourless, and until about the 1920, the only cellular nitrate plastic available was light coloured or translucent.
      An old, rusted, rolled up film reel made from Cellulose Nitrate
      The stability of cellulose nitrate is strongly influenced by the amount of nitrogen present, the more nitrogen content, the more unstable the product. Therefore, products with high nitrogen content (usually more than 13%) are likely to explode on contact to heat, friction, or shock, whereas objects with a lower nitrogen content (typically less than 12%) are not explosive.

      There were two main types of Cellulose Nitrate Guncotton and Nitrate Film: 

      Guncotton:
      In general, cotton was used as the cellulose base, and is added to concentrated sulphuric acid and 70% nitric acid cooled to 0 °C to give cellulose trinitrate (or guncotton).
      While guncotton is dangerous to store, its risks can be reduced by storing it wet or in oil.
      Nitrate Film:
      Cellulose is treated with sulfuric acid and potassium nitrate to give cellulose mononitrate. This was used commercially as Celluloid, a highly flammable plastic used in the first half of the 20th Century for lacquers and photographic film.

      However, cellulose nitrate degrades to produce acidic and oxidizing nitrogen oxide gas. In enclosed spaces with restricted ventilation, these gases can build up, causing metal to erode, and discolour organic materials, as well as accelerate the process at which objects decay. Cellulose nitrate is additionally a very flammable material and must be isolated from heat and ignition sources.

                                                                            ⫷⫸⫷⫸⫷⫸
                                        Thank you very much for reading my post on Cellulose Nitrate.
                                                       Next up, will be a post on Sustainability!

      Thermosetting Plastics

      This second blog on Materials and Processes we will encounter and undertake in the workshop is based on Thermosetting plastics. Now, in my previous blog based on Thermo Plastics, my last information paragraph was as follows: Sometimes, thermoplastics are confused with Thermosetting Plastics. Although they may sound the same, they actually contain very different properties. While Thermo Plastics can be melted to a liquid and cooled to a solid, Thermosetting Plastics chemically deteriorate when subjected to heat. Ironically, however, Thermosetting Plastics tend to be more durable when allowed to cool than many Thermo Plastics.

      In this blog, I will go into more detail about this confusion and comparison and other aspects of Thermosetting Plastics.

      ≌≌≌≌≌

      Thermosetting plastics are synthetic materials that strengthen during being heated, however, cannot be remoulded of reheated after their first heat-forming. Thermosetting plastics retain their shape and strength after heating, which makes the plastics well suited for the production of permanent components and large, solid structures.


      Examples of thermosetting plastics include epoxy (as shown below), and because it has excellent chemical, thermal and electrical resistance and can be used for coatings, casting compounds, adhesives (as shown below) and encapsulating for electrical components (e.g. covering for a wire cable). Additionally, Phenolic plastic is another example of a thermosetting plastic.


      Epoxy - In The form Of Clear Adhesive Glue
      !!!HERE IS A FUN FACT!!!

      Phenolic plastic was created by Leo Baekland. This type of plastic was solvent and water resistance, and was used in early consumer electronic items such as telephones, radios, and records. However, Phenolic plastics are used little in consumer products today due to the cost and complexity of its production and its brittle nature.

      ≌≌≌≌≌


      Thank you very much for reading and keep a look out for my next blog on Cellulose Nitrate (an extension that caught my eye when I was researching information on Thermosetting Plastics).

      Thermo Plastics


      The next few blogs that I will be posting, will be regarding different types of plastics and different processes we will undertake in the workshop during our clock making process. This first blog is on Thermo Plastics.

      ≈≈

      A thermoplastic is a type of plastic made from polymerresins that becomes a homogenized liquid when heated and hard when cooled. When frozen, however, a thermoplastic becomes glass-like and subject to fracture. These characteristics, which give the material its name, are reversible. That is, it can be reheated, reshaped, and frozen repeatedly, Which additionally makes thermoplastics recyclable. Heading into more detail about why Thermo Plastics can be recycled is because the weaker interactions between polymer chains break down at much lower temperatures than the chemical bonds between monomers. This allows thermoplastics to be recycled indefinitely until the polymers are broken down to the point that the material loses structural integrity.

      Thermo Plastics are different from Thermosetting Plastics however, as on heating this type of plastic, it does not undergo a chemical change, whereas Thermosetting Plastics do. Additionally, Thermo Plastics cannot resist heat very well and therefore can easily be formed into other shapes, making it one of the most common materials used in the school workshop. A moulded sheet of Thermo Plastic that has been formed into a shape can be reheated and it will return to its original shape. This occurrence is referred to as plastic memory.

      Examples of Thermo Plastics include Polyamides (or nylon), acrylics and Polystyrene (as shown below). As Polyamides is tough and resists abrasion, as well as being self-lubricating, makes it ideal for ropes, fishing line, gears and zips. Acrylics have good impact strength and transparency, which is why it is most often used in goggles, windows and lenses. Polystyrene is easy to use, and comes in many colours, making it an ideal material to use in packaging trays, vending cups and ceiling tiles.
      Polystyrene - in this case in the form of a disposable cup.


      Sometimes, thermoplastics are confused with Thermosetting Plastics. Although they may sound the same, they actually contain very different properties. While Thermo Plastics can be melted to a liquid and cooled to a solid, Thermosetting Plastics chemically deteriorate when subjected to heat. Ironically, however, Thermosetting Plastics tend to be more durable when allowed to cool than many thermoplastics.
      ≈≈

      Thank you very much for reading and keep posted for more useful information!

      Lest Lesson for Term 3

      7K's last Design Futures lesson was our final lesson of the Term - and can I say, it was DEFINITELY the best and most exciting. When we first walked into the workshop, Mr Andrews was preparing a machine to cut some more MDF for the students without a square for their clock - little did I know that he would ask me next along with 3 other girls and himself to cut the MDF. We did this in front of the class so they could see the machine in action, but most were startled at the noise! The process for cutting the MDF was quite simple really;


      1. Two people at either end of the long sheet of MDF pushed it onto the bench and into the saw. 
      2. Myself and another girl at the opposite end then had to pull it out making sure the wood at all times   was brushing up against a metal barrier. 
      3. Mr Andrews was standing on the out-wards side watching the process ready to act on any problems that may have occurred. 

      ...unfortunately for us there was a problem. About half way through the process, the machine started squealing (more than its usual loud sawing sound). Mr Andrews stopped the machine immediately and all pushing and pulling stopped. We were informed that we were not pushing the MDF towards the metal barrier enough, this had caused the machine to jam, the saw to lock and the woo to have sharp jagged edges. Once we realigned the wood we tried again however the saw kept jamming on the already jagged edges. Mr Andrews turned the MDF around (with the help of us extremely muscular girls...not) and we started form the other end. The saw again jammed but luckily the two ends had been met and the MDF was cut!

      Mr Andrews then invited some other girls to help him cut the long strip of MDF into smaller individual squares. This was when the rest of the class (who were able to) started tracing their first clock layer onto their square for Mr Andrews to cut out. I have decided that the actual shape of a Ferris Wheel is not to be cut as a base layer, simply because the main cutting machine cannot accurately cut it out and there is not enough time to use a hand-held saw or sander. Instead, I will probably paint the gaps in when decorating my final result. As a result, my first layer is a circle.

      After my first layer was cut out, I sanded the edges of my first layer with sandpaper, and then the bumps with a curved file, however the circle shape still seemed uneven - so Mr Andrews used the 'motor-operated sanding machine' to finish it off. My final result was a completely smooth circle that will be my first layer. For the rest of the working time in the lesson, which was only about five minutes in total, I started work on my second layer, which is basically my second layer traced onto a piece of grey, stiff cardboard.

      Next lesson, I will definitely be finishing tracing my second layer on the cardboard, which will take longer than my first as it was not cut perfectly, and it involves a lot of painstaking and precise cutting of smaller shapes and then cutting in between them. So I will probably spend most of the lesson on my second layer - if not all. Hopefully, I will be able to finish that, I will cut it out, and then start on my third layer of Ferris Wheel detail, most likely on the grey cardboard again.
      A summary for this Term would be:

      • I have decided on my design.
      • I have completed all blogs for all lessons and will now commence blogs for different materials and processes e.g. Thermo and Thermo-Setting Plastics, the Vacuum Forming Process etc.
      • I have decided and completed all my layers - plan.
      • I finished my first layer. 
      • I've started on my second layer.
      • And my goal and plan for next lesson will be finishing my second layer and starting on my third.
      Thank you Mr Andrews for a wonderful Term and I cannot wait until Term 4 when we will really be knuckling down into the clock-making process! 

      Bye for now and keep posted for my next blogs on information that will help me and possibly you in creating your own clock!

      Saturday, September 15, 2012

      In The Workshop...

      YAY! I am so excited, we are finally in the workshop. All our hard work of finding and deciding on the right clock for us, and then creating and forming our layers is all about to come together in our finalised clock. On Thursday, Mr Andrews told us that after he did a final check on our layers - making sure they were okay, he would take us on our first venture to the workshop to begin working. Luckily enough, everyone's layers must have been ready as we were taken to the workshop. This was quite a relief for me as even though I spent quite a long time on the weekend perfecting my layers, I wasn't quite sure if they were correct.

      Once clock layers from our class had 'passed the test', Mr Andrews took us to the workshop. We left our books outside on some racks and walked inside making sure to stand behind the safety line (yellow marking tape) - this was to ensure everyone was in the one place at the one time and that Mr Andrew's knew that no-one could be hurt by any tools or machines. At the same time we were taken into the workshop, Mr Ward was teaching some Grade 11 students. This didn't bother me at all, and if anything I thought we were quite lucky to have them in there as 7K had the opportunity to see what a class looked like 'in action'.

      After Mr Andrews instructed us on a few safety precautions - such as never cross the safety line unless instructed to, always wear an apron and goggles (goggles depend on the activity you are doing), and when the teacher says STOP everyone must  stop completely and immediately. We were allowed to go to one of the working benches and choose a piece of MDF wood square carving that would fit the shape and size of our layering images. Now, my clock fitted best to a square shaped piece of wood, however it needed to be even all the way around (e.g. 20cmx20cm not 15cmx22cm) as all my carrousels needed to be able to fit on without cutting them in half. Finding a piece of wood suitable for me was not as easy as it was for some other girls but in the end there were two pieces of wood I found that I was tossing up between to decide which one would be the most space-efficient to the size of my clock.

      By the time everyone had found their piece of wood (at this point I was helping Charlotte with her layers and wood) Mr Andrews told us that the lesson was nearly over and that we needed to pack up. Everyone understood completely, took off their aprons, put their layers and piece of MDF wood into a cupboard underneath one of the working benches and reassembled behind the safety line, for Mr Andrews to do a short re-cap on the lesson and dismiss us.

      I thought this would have to be the most exciting lesson we have had yet, as we were finally allowed to go into the workshop, and begin the hands-on process to our clock building and making. What I also loved was the fact that Mr Andrews told us to always meet down at the workshop now, and not in the computer room - this reinforced to us that we would definitely start to make our clocks and not go back to the computers to plan anymore.

      I cannot wait until our next lesson and next Term when we are able to put all this Term's (Term 3) hard work into a finalised and practical result!


      Tuesday, September 11, 2012

      Layering Lessons


      For the past few lessons 7K has been starting our layering process and now in the 9th week of Term, we are finally ready to start doing practical lessons in the workshop!

      Firstly we had to find images of our chosen clock design - in my case this was a Ferris Wheel; preferably vintage. After we had found either one image that would be suitable to start designing our layers on we would print it out and highlight all the different layers. However I chose another option, none of the images on google were suitable for what I wanted my clock to be or resemble. For example:

      They only show parts of the Ferris Wheel or the picture is not front on...


      They do not have 12 spokes for all 12 numbers on a clock...


      Or they were too plain, boring and non-realistic...


      So I found two different pictures and blended them together. I found one of a ferris wheel with 12 spokes (so I have room for all 12 numbers) which also had good detail in the middle and a elegant yet sturdy looking base without being too noticeable or too blended in. Then I took my second image and cut out the carriages (as the other image didn't have any) and also cut out a cute vintage centrepiece which was also located from the second image. I then glued them together and pretended like it was already an image I found so I could continue with the following steps.

      Next, we had to photocopy our photo and go around each layer in a different colour so we could tell which was the 1st, 2nd, 3rd etc. I had some trouble with this initially, however, as I thought I had 12 layers, but Mr Andrews explained to me that this was far too many and some layers could be joined together. He also said that some were too small to make and I could just paint them in. I also found and observed that everyone else in the class struggled with the layers in one way or another. For example some people would cut gaps in their layers, this was incorrect as you needed a base and to think in advance for the next layer, otherwise they would all fall into each other (into the open gaps) and you would end up with only a one-layered clock. Only Lois managed to do this properly...even I made a mistake with my first layer!

      After we had decided on how many layers our clock would consist of we had to photocopy our original image one time for each layer and then another as a spare (so say if your clock had 5 layers, you would photocopy it 6 times).

      These steps have been very time consuming and have occupied us for the past three to four lessons. Now, everyone's layers should be completed which now gives us all the opportunity to start the initial process of practical work in the workshop! I am really excited for next lesson, and are completely prepared for any  challenges or successes (lows or highs) my clock presents me with.


      Tuesday, July 31, 2012

      No.3 - Gingerbread Man or a Gingerbread House

      A Gingerbread Man or Gingerbread House comes in as my third possibility as a clock design. The reason it is not first or second is because I think they are quite simple in shape e.g. a house or man. But with the different shapes and textures on these clock ideas I could make them extremely interesting. For example:

      Gingerbread Man:

      • I could make it look as though I have piped the eyes, nose, mouth etc. onto it. This would add more textures and make it actually look like a Gingerbread Man.


      Gingerbread House:
      • I could also use different materials to make the different lollies on the house.
      • I could make the house seem more like a house by making windows, letter-boxes, flower-boxes, a door etc.

      My only problem with these designs would be that they could be too simple, I wouldn't really have a place to put the numbers onto (which isn't necessarily that bad!), I would also have trouble making the house actually look 3D e.g. the roof and all four walls, without drawing it on its side which may look quite weird. My other option would then be to just do the front of the house, but again that would be to simple and not that interesting to the eye.

      If I did end up choosing to do these clock ideas, I am sure I could work cooperatively with Mr Andrews so he could help me come up with a solution to solving the aspects of these clock ideas I do not like!

      No.2 Jar

      This is just an idea of a jar - not the exact one I am doing.
      However if I will do it and I like the shape, I could print,
       cut it out and then trace the shape.
      My second possibility for a clock design (my backup) would be a jar. I think this would be a fantastic idea as I could make little trinkets or objets out of other materials and then put them on top of the jar cut-out, making it seem as if I have things in the jar. This design would have a lot of room for colour; the different objects in the jar, a lot of room for texture; also the different objects in the jar but the lid of the jar and the string to tie around the lid. I would also be able to show many different skills by making the many different objects. If I felt it were necessary or I really wanted to, I could make different objects with the numbers 1-12 on them to symbolise the time. This would be a great idea as it would come across as more of a clock, rather than a jar with ticking hands on it. If space didn't allow or I felt it weren't necessary and didn't look good, I could always just make objects with only a few numbers on them e.g. 12, 3, 6, 9.

      Overall I feel this would be a fantastic idea as I could incorporate many different skills, colours, textures  and ideas into this clock. I also think it is a really sweet idea and actually resembles a clock!

      No. 1 - Ferris Wheel

      A ferris wheel would be my first preference as a clock design for many reasons. Some of these include:

      • I think it would be a fantastic design to use different skills, techniques and materials I could use and do.
      • It would be different as there would be many slits cut out (because in a ferris wheel the arms are not all joined together and they don't have a backing board, the carrousels also swing freely), this would also make it interesting as my clock would not be a block shape.
      • I would be able to make 12 carrousels each with the numbers 1-12 to symbolise the numbers of time on the clock and also the numbers of each carrousel.
      • I would be able to incorporate many variations of colour and 3D elements e.g. each carrousel or arm could be a different colour, I could make little lights to put on the arms (beads, scrunched up paper and cardboard which is then glued in the shape of a small ball) or I could even make little roofs for the carrousels which could involve different colours and textures. 
      • As the hands are ticking away it would give the effect that the ferris wheel was moving as they are both moving in the same circular motions (only the ferris real in reality, not on the actual clock).
      • I would also like to do this design as I simply like ferris wheels, I think it will show different techniques I can use and I really think this will make a fantastic clock...it would also go nicely in my room or study (not that that is influencing my choice)!

      If by any chance I am not able to make slits in the ferris wheel, I would be okay showing that using 3D elements and paining the background blue for the sky!

      Overall, I would really love to make/do this clock design an I think it is a very smart and unique idea!

      All My Possible Clock Designs

      These were my original clock designs, but I shortened this down to 3 designs.
      (in order of preference):

      1. A Ferris Wheel
      2. A Jar - this would be a clear jar so you could see little belongings inside it
      3. Either A Gingerbread House or a Gingerbread Man - like the actual foods.

      Please continue reading to see my evaluations on each of these possibilities!

      Saturday, July 28, 2012

      Our First Lesson - Reflection

      Today was our first day of Design Futures and the main point of the lesson was to know everything! From what our goals for this semester were to safety in the workshop. The different tools we would be using or would see Mr Andrews use, to the make and design of our clocks. From safety in the workshop to doing our blogs and the computer room. This was our starter lesson!

      Firstly, we were escorted by Mr Andrews to a computer room (above the workshop), this is where he said we would be having our initial lessons so we could learn about DF, the workshop, safety, the design and make of our clocks and our blogs. We then sat down and watched  PowerPoint describing what we needed to know. We learnt about the practicality of old and new designs which would help us when the time came to start thinking about our clock designs, we also learnt that our grades would also be related to how detailed and what we posted on our blogs. Another key factor to the powerpoint was safety and rules for the workshop.

      About half-way through the powerpoint, Mr Andrews took us down to the workshop so we could understand the rest of the PowerPoint. This was my favorite part of the lesson! Firstly we put on our aprons and goggles and were told about the yellow lines on the floor - unless told we were not aloud to go past them, we were also informed of two important buttons - the first was a button that turned all power on in the workshop, and the second immediately cut all power off incase of an emergency. After we were all clear on when and why we would need to use the buttons Mr Andrews took us over to some clocks other students were either in the process of or had finished making. This is where we also learnt how we would make our clocks.

      Firstly, we would draw our main shape onto a piece of MDF wood and once we were happy with it, Mr Andrews would cut it out with a machine - something too dangerous for us to use! After the main shape was cut out, Mr Andrews would then use a sanding-like machine (again, far to dangerous for us to use) to smooth out the edges, or make finer indentations. The next step heavily involved us! We would use other materials like extremely thick cardboard, corrugated cardboard, pipe-cleaners or other materials found to make the small details of our clock such as wings, different textures or many other design elements. Mr Andrews then showed us the many different tools we would use to make this possible - some more complex and dangerous than others. The next step was then Mr Andrews' task, he would put our wood mould into a machine, warm up some plastic and compress it over the moulds - picking up every single little detail. After a few minutes he would separate the two, and voila! We would have our plastic clock. The final task was again for us to do! We would cut out the plastic clock and paint it from the inside - any colour we wanted. This was so we would still have the shiny plastic effect! After our base was dry we would attach the hands to the front and battery/machine of the clock to the back ready to take home! Whilst explaining this to us Mr Andrews was demonstrating with a sample clock, so we could experience it first-hand before trying it out our selves. 

      After we understood and knew our goals for this Semester, Mr Andrews took us back to the computer room to finish off the PowerPoint.

      Based on our lesson today, I am very much looking forward to this Semester and cannot wait until we start making our clocks!